


Many kitchens commonly use an island around 6 feet by 3 feet when space permits, but the real constraint is space: a minimum useful footprint runs about 24" by 48", and skipping the aisle-width check is how “perfect” islands end up blocking every path in the room.
TL;DR:
- The ideal kitchen island size for medium kitchens is about 6 feet by 3 feet, representing roughly 10% of the total kitchen area to avoid overpowering the space.
- Clearances around islands should be at least 36 inches for simple walkways and 42 inches for one-cook work aisles; 48 inches is recommended for two-cook kitchens.
- When installing a sink or cooktop, island depth should increase to at least 36 inches, with a minimum of 24 inches for prep-only surfaces without plumbing or gas.
- Proper planning requires measuring your space, mock-up with tape, and considering appliance swing arcs to ensure the island fits comfortably without restricting movement.
- Electrical and plumbing connections must be finalized before installation, as outlets, circuits, and venting significantly influence the island’s size, layout, and support requirements.
Table of Contents
- What Are Standard Kitchen Island Dimensions For Small, Medium, and Large Kitchens?
- How Much Clearance Do You Need Around a Kitchen Island?
- How Many Seats Fit at a Kitchen Island, and What Overhang Do You Need?
- When Does an Island Need Extra Depth for a Sink or Cooktop?
- Measuring Your Kitchen for the Right Island Size
- What a Contractor Checks Before Building Your Kitchen Island
- Why Outlets and Circuits Matter as Much as Island Dimensions
- Getting the Proportions Right Without Sacrificing Function
- How Mrbuild Helps You Plan and Build the Right Island
- Sources
What Are Standard Kitchen Island Dimensions For Small, Medium, and Large Kitchens?
Kitchen island dimensions scale with the room, not with what looks good in a showroom photo. Small kitchens need modest islands, while open floor plans can accommodate larger islands within reasonable limits.
Here’s how the sizing typically breaks down:
- Small kitchens: around 4’ x 2’, suited to a compact prep surface without seating
- Medium kitchens: roughly 6’ x 3’, the size most designers land on for a mix of prep space and two to three stools
- Large kitchens: 8’ x 4’, or 10’ x 4’ in especially spacious rooms, often with room for four seats plus a secondary sink or cooktop
The math behind that range comes from a simple guideline: an island should generally stay within about 10% of the kitchen’s total square footage. A kitchen of modest size should keep its island footprint proportionally small to avoid dominating the room, which lines up almost exactly with a 6’ x 3’ footprint. Go bigger than that ratio and the island starts to dominate the room instead of serving it.
If your kitchen is unusually large, resist the urge to build one oversized slab. A double island, or a single long run split into a prep zone and a seating zone, usually works better than one massive block that forces everyone to walk around it to reach the sink.
How Much Clearance Do You Need Around a Kitchen Island?
Clearance is where most island plans fail, not size. You can have a beautifully proportioned island and still end up with a kitchen that feels cramped if you shortchange the aisles around it.
The industry numbers are specific and worth writing on a sticky note before you shop for countertops:
- 36 inches minimum for a simple walkway with no work happening on either side
- 42 inches for a one-cook work aisle, where someone is actively using counters or appliances
- 48 inches for a two-cook kitchen, giving both people room to work without colliding
- 44 inches behind seating whenever foot traffic passes through that space
These figures come from designer-backed guidance on kitchen island clearance, and they’re the numbers the National Kitchen and Bath Association built its planning standards around.
Here’s the arithmetic that actually determines whether an island fits: take your room width, subtract the standard perimeter cabinet depth (25.5 inches on each side, or 51 inches total for a galley-style kitchen), then subtract your chosen aisle width on both sides. Whatever remains is your maximum island depth. Kitchens need to be wide enough—generally around 13 feet or more—to comfortably accommodate a standard 3-foot-deep island with adequate aisles and cabinet space.
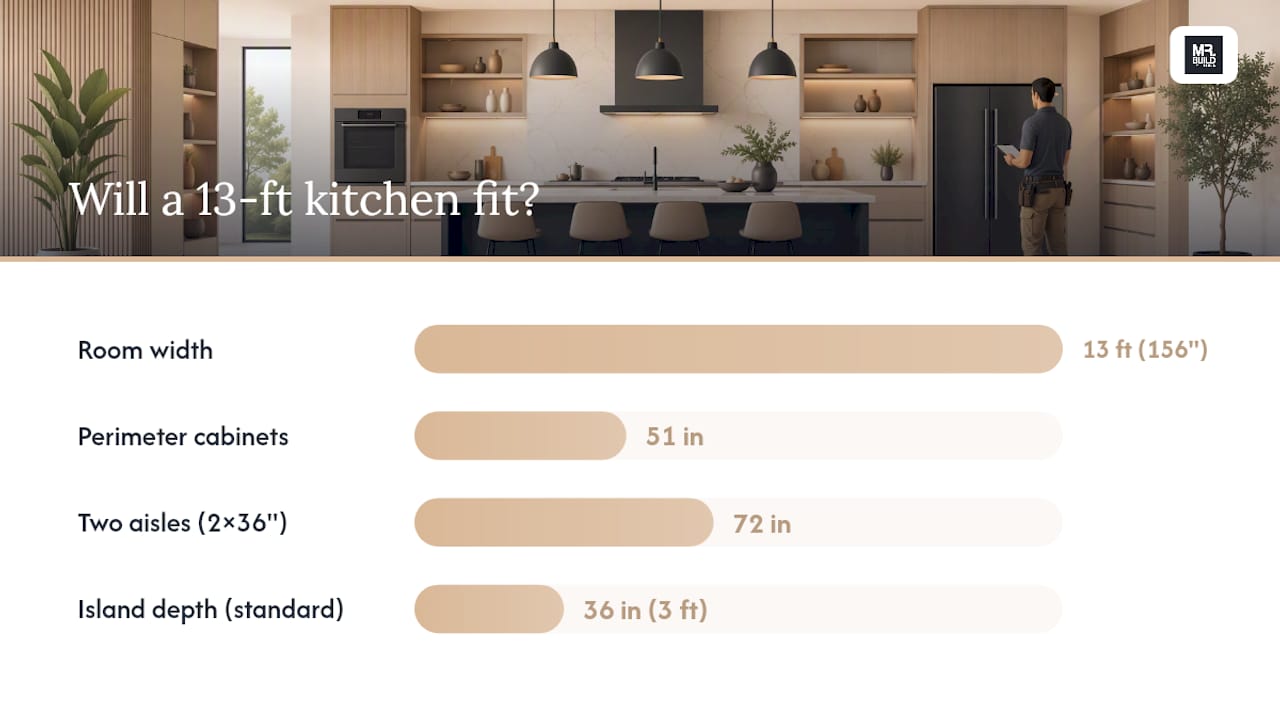
One thing homeowners consistently forget: appliance doors swing open into that clearance zone. A dishwasher, oven, or fridge door can eat 24 inches or more of your aisle when fully open. Measure those swing arcs before you finalize island depth, not after.
How Many Seats Fit at a Kitchen Island, and What Overhang Do You Need?
Seating comfort comes down to linear counter width, not island length alone. Plan for 24 inches per person as an absolute minimum, though 26 to 28 inches feels noticeably better once people are actually elbow to elbow with plates in front of them.
That translates to real numbers: a 6-foot island seats two to three people comfortably, while an 8-foot island fits three to four. Beyond that, you’re usually better off wrapping seating around an L-shape or adding a second zone.
Overhang and support matter just as much as length:
- 12 to 15 inches of overhang works for standard 36-inch counter height seating
- 12 inches is the norm at 42-inch bar height, where knee clearance is tighter
- Anything past 12 inches typically needs corbels or steel brackets underneath, since countertop material alone can’t cantilever that far without support
- Behind every seated position, keep that 44-inch clearance if anyone will be walking behind the stools during meals, or seating turns into a bottleneck the moment two people are in the kitchen at once
When Does an Island Need Extra Depth for a Sink or Cooktop?
A prep-only island can stay lean. A prep-only surface works fine at 24 to 30 inches deep, since all you need is room to cut vegetables and stage dishes.
Add a sink or cooktop and that number jumps fast. Depth guidelines shift accordingly:
- 24"–30" for prep-only islands with no plumbing or gas lines
- 36"–48" once you introduce a sink or cooktop, to leave safe counter space on either side of the appliance
- 48" or more for dual-sided islands with storage accessible from both the kitchen and seating side
The systems behind these appliances add their own constraints. A cooktop needs a ventilation hood or downdraft system sized to the burner output, a sink needs plumbing that vents properly through the floor or a nearby wall, and both typically require dedicated electrical circuits.
Pro Tip: Keep your wet zone and cook zone on the far side of the island from your seating whenever the layout allows. It keeps splashes, steam, and hot pans away from anyone eating breakfast six inches away.
Measuring Your Kitchen for the Right Island Size
Skip the guesswork and grab a tape measure. This is the checklist that turns a Pinterest board into a workable plan.
- Measure your usable floor area, excluding the arc where appliance doors swing open, then calculate 10% of that number as your rough maximum island footprint.
- Measure perimeter cabinet depth (25.5 inches is standard) plus any appliance swing, then pick your desired aisle width, 36", 42", or 48", based on how many cooks typically work at once.
- Subtract those numbers from your total room width to get your maximum island depth and length.
- Mock up the footprint with painter’s tape or flattened cardboard boxes directly on your kitchen floor.
- Live with the mock-up for a few days. Walk your normal routes, open the fridge and dishwasher, and see where you bump into the taped outline.
- Call a contractor if the plan requires moving plumbing, adding electrical circuits, or altering structural framing, since none of those are DIY-friendly fixes.
Pro Tip: If your kitchen measures under 13 feet wide, a fixed 3-foot-deep island probably won’t leave enough clearance. A movable island on locking wheels or a peninsula attached to existing cabinetry gives you the extra surface without permanently narrowing your walkways.
What a Contractor Checks Before Building Your Kitchen Island
Homeowner drawings and finished islands rarely match exactly, and that’s normal. On-site adjustments are common as contractors work around joists, existing plumbing runs, or subfloor conditions that weren’t visible until demolition started.
Before cabinetry and countertops get ordered, a contractor typically verifies:
- Electrical capacity, confirming the panel can support new dedicated circuits without an upgrade
- Plumbing routing, especially if a sink is moving to the island and needs new supply and drain lines
- Venting requirements for any cooktop, since ductwork often has to run through cabinetry or up through the ceiling
- Structural support under the subfloor, particularly for stone countertops or islands with heavy overhangs
Mocking up your footprint with tape is a useful first step, but booking a site review before ordering fixed cabinetry catches the problems a drawing simply can’t show.
Why Outlets and Circuits Matter as Much as Island Dimensions
Electrical and plumbing requirements aren’t an afterthought you handle after the island is built. They shape the dimensions in the first place, especially once you add seating, a cooktop, or a prep sink to the design.
Any island that measures roughly 1 foot by 2 feet or larger typically needs wiring for at least one GFCI-protected outlet, which is standard practice for countertop receptacles near water sources. That outlet has to sit somewhere on the island’s perimeter without interfering with seating overhangs or cabinet doors, which can quietly eat into your usable depth.
Appliances raise the stakes further. A cooktop or a built-in microwave drawer on the island usually needs its own dedicated 20-amp circuit, separate from general kitchen lighting and countertop outlets. That circuit has to originate at the panel and route through the floor or a nearby wall cavity, which is one reason movable islands can’t simply be relocated a few feet without an electrician’s involvement.
Plumbing follows a similar logic. A sink on the island needs supply lines and a drain that connects to the home’s venting system, and that venting often determines where the sink can physically sit within the island footprint. In older homes, running a new vent stack can mean opening up the subfloor or even the ceiling below, which affects both your budget and your timeline. None of this is reason to avoid a functional island. It’s reason to nail down electrical and plumbing scope before you fall in love with a specific cabinetry layout.

Getting the Proportions Right Without Sacrificing Function
Extra inches on an island rarely fix a kitchen. Extra clearance almost always does. If you’re choosing between a slightly bigger island and a slightly wider aisle, take the aisle every time, since a cramped walkway will bother you every single day in a way that a few missing inches of countertop never will.
The tape-measure mock-up isn’t optional in my view. It’s the cheapest insurance available before a remodel, and it’s the single step homeowners skip most often. When the systems work, electrical, plumbing, structural, gets complicated, that’s the moment to bring in a professional site review rather than guess.
— David S.
How Mrbuild Helps You Plan and Build the Right Island
Getting the math right on paper is one thing; seeing how an Outdoor Kitchen & Living Space in Vail, AZ integrates layout considerations can inspire your own proportional design. Making sure your subfloor can support a 400 pound quartz slab, or that your panel has room for a dedicated 20-amp circuit, is another. That’s where a hands-on contractor closes the gap between a tape-measure mock-up and a finished kitchen.

Mrbuild handles the parts of island planning that go beyond a checklist: precise site measurements, permit coordination with your local building department, and the electrical and plumbing trade work that a sink or cooktop on the island requires. Our team also manages cabinetry installation from framing through final counters, so the transition from your painter’s-tape mock-up to a finished space doesn’t lose anything in translation. If you’re weighing an island as part of a larger kitchen overhaul, our kitchen remodeling team can walk your space and tell you within one visit whether your dream footprint actually works with your panel, plumbing, and joists.
To get started, request a consultation and have your rough sketch or tape mock-up ready, along with any known constraints like panel location or existing plumbing lines. It gives our team a real starting point instead of a blank slate, and it usually shortens the time between that first conversation and a workable plan.
Sources
For deeper reading on clearance standards, seating math, and depth guidelines referenced throughout this guide, see Forbes’ kitchen island size guide, House Beautiful’s island calculation guide, the Captivating Cabinets clearance breakdown, and A Little Delightful’s dimension planning guide.
- Standard kitchen island size guide | Forbes
- How Much Kitchen Island Clearance Do You Really Need – Captivating Cabinets Blog
- Kitchen island dimensions: sizes, clearance and planning rules | A Little Delightful

