


Most homeowners land between $10,000 and $15,000 for a mid-range curbless shower, with a typical premium of 150 to 200 percent over a standard curbed shower baseline. That premium comes down to four things: subfloor recession or a raised slab, a full waterproofing membrane system, the drain type, and skilled tile labor to hold a consistent slope with no lip. Line-item ranges below show where your money actually goes.
TL;DR:
- The cost to install a mid-range curbless shower typically falls between $10,000 and $15,000, with most projects including proper waterproofing and slope adjustments.
- Subfloor modification can account for up to $4,000 of the total, especially if joist reinforcement or slab adjustments are necessary to ensure proper drainage.
- Contractors generally charge 150 to 200 percent more than a standard shower, with drypack waterproofing costing slightly more than foam panel systems.
- Accurate estimates require detailed bids that specify subfloor work, waterproofing brand, drain type, and testing procedures before tiling begins.
Table of Contents
- How Much Does a Curbless Shower Cost by Tier?
- What Drives the Line-Item Cost of a Curbless Shower?
- Foam Pan or Drypack: Which Costs More?
- How Do You Get an Accurate Curbless Shower Estimate?
- How Long Does a Curbless Shower Take, and Do You Need a Permit?
- What Does a Curbless Shower Cost Long-Term?
- What Does ADA Compliance Add to a Curbless Shower Budget?
- Mr Build Co.’s Perspective on Curbless Shower Costs
- Get a Written Curbless Shower Scope from Mrbuild
- Sources
How Much Does a Curbless Shower Cost by Tier?
Where you land on the price spectrum depends less on square footage and more on what’s under the tile. A curbless shower removes the built-in slope reference point a curb gives you, so the floor structure has to do that work instead, and that structural adjustment is what separates a $6,000 job from a $22,000 one.
Low tier ($6,000–$9,000): This range covers prefabricated curbless base kits paired with basic subway tile or a simple large-format porcelain field. You’re getting a functional zero-threshold shower, but often with a compromise, like a shallower recession that limits future flexibility, or a point drain instead of the linear drains most curbless designs are built around.
Mid tier ($10,000–$15,000): This is where most custom tile jobs land, according to national cost data for curbless installations. Expect a proper subfloor recession or drypack mortar bed, a linear drain, full-height tile walls, and a glass panel or door. This tier assumes standard-size showers, roughly 4 by 6 feet, with mid-grade porcelain tile.
Premium tier ($16,000–$25,000+): Natural stone, large-format slab tile with minimal grout lines, heated floors, custom niches and benches, and frameless glass push costs upward fast. Regional remodel data shows premium projects in high-cost labor markets routinely landing at the top of that range or beyond.
Compared to a curbed shower using the same tile and glass package, expect to pay $3,000 to $8,000 more for the curbless version once you factor in the added waterproofing and slope work, even though some conservative estimates put the incremental difference as low as $500 to $700 for simpler layouts.
What Drives the Line-Item Cost of a Curbless Shower?
A curbless shower is really seven separate cost categories stacked into one project, and any single one can blow up your budget if it’s underscoped in a bid.
- Demolition and disposal: $500–$1,500, depending on whether the existing shower pan and surrounding wall tile need to come out down to the studs.
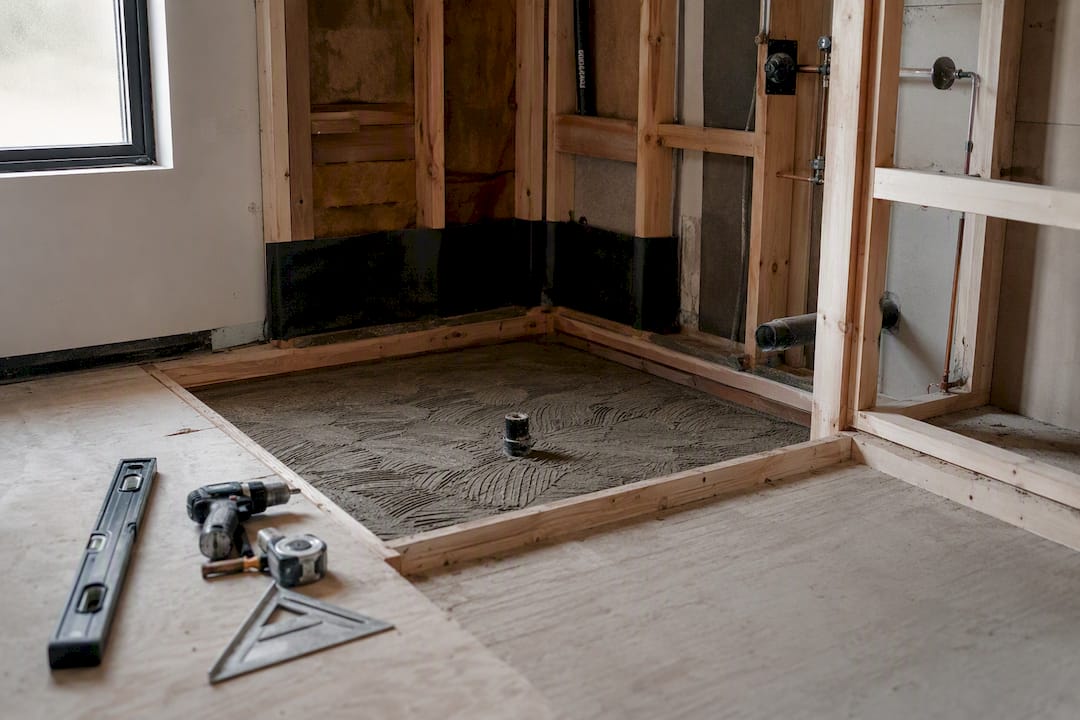
- Subfloor recession or slab modification: $1,000–$4,000. This is the single biggest wildcard in curbless pricing because it can mean cutting and reinforcing floor joists, not just removing material.
- Waterproofing system: $800–$2,500 depending on whether you use a foam pre-sloped pan, a traditional drypack mortar bed, or a sheet membrane over drypack.
- Drain and plumbing coordination: $400–$1,800. Linear drains cost more than point drains, and repositioning drain lines to match a new slope direction adds plumbing labor.
- Tile material and labor: $3,000–$8,000, the widest range in the whole project, since porcelain runs far cheaper than natural stone or large-format slabs.
- Glass enclosure: $800–$3,000 depending on frameless vs. framed and custom sizing.
- Extras (niches, benches, heated floors): $500–$3,000 combined, entirely optional but common in mid and premium builds.
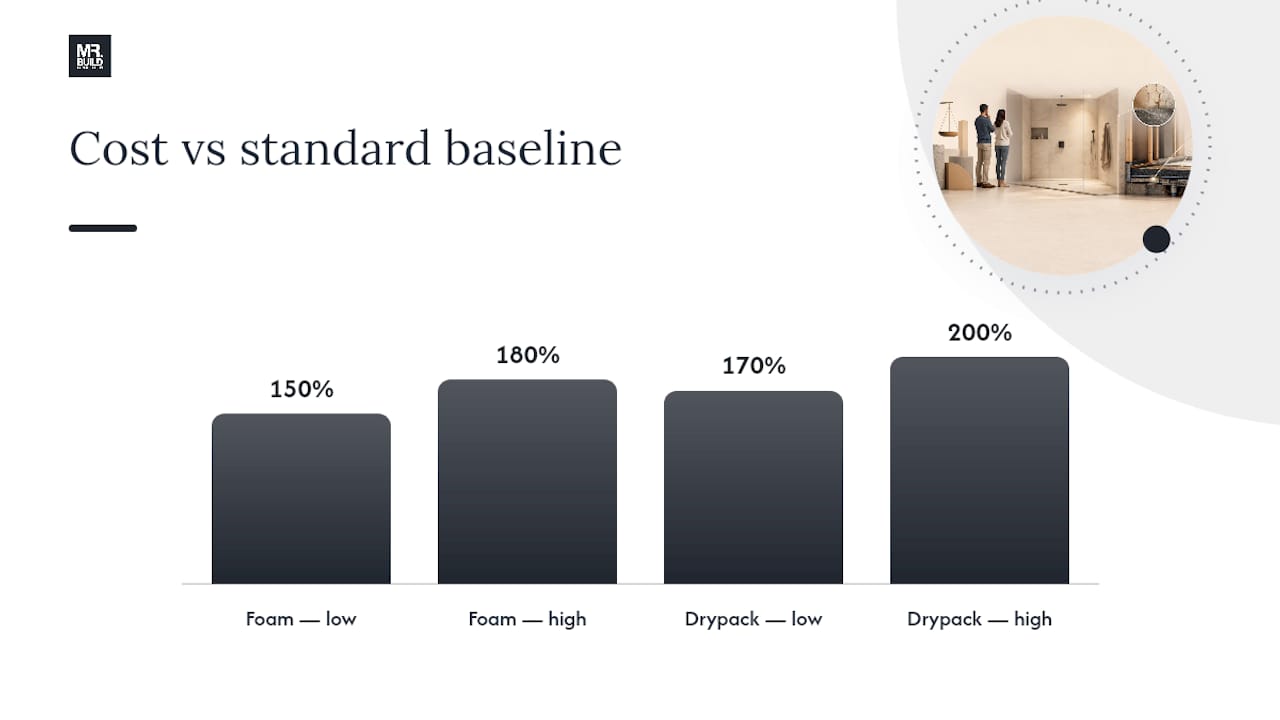
Quick stat: Contractor pricing guidance puts total curbless installation at roughly 150 to 200 percent of a standard custom shower baseline, with foam-panel systems trending toward the lower end of that range and drypack systems toward the higher end.
Here’s what that looks like for a common 4 foot by 6 foot shower using a drypack system: demolition $900, subfloor recession $2,200, drypack waterproofing $1,600, linear drain and plumbing $1,100, porcelain tile and labor $5,200, frameless glass $1,800, and a built-in niche $400. That totals roughly $13,200, comfortably inside the mid-range tier and consistent with the line-item estimate breakdowns contractors commonly publish for similar-sized projects.
Foam Pan or Drypack: Which Costs More?
The waterproofing system you choose changes both the price and the risk profile of the entire project, and this is the decision where homeowners most often get surprised by change orders.
Foam pre-sloped pan systems, like the pan-and-membrane products from manufacturers such as Wedi or Schluter’s Kerdi line, cost more in materials but install faster and often require less joist recession because the slope is built into the panel itself. Drypack mortar beds cost less in materials but demand more skilled labor and time, since a tile setter has to hand-float the slope. Drypack tends to be the better choice for irregular shower shapes or curved layouts where a rigid foam panel won’t conform.
Joist modifications only come into play when you’re recessing the floor below the existing subfloor line, typically 1.5 to 2 inches for a proper curbless slope. If your bid doesn’t separately price this, ask why.
- Foam panel systems: roughly 150 to 180 percent of a standard shower baseline.
- Drypack systems: roughly 170 to 200 percent of that same baseline.
- Linear drains are effectively required for most open curbless layouts because they let the entire floor slope in one direction instead of toward a center point.
- Red flags in a bid: no mention of a flood test, vague phrases like “standard waterproofing,” or no named drain model or brand.
Pro Tip: Ask every bidder to name their waterproofing system by brand and product line, not just describe it generically. “Schluter Kerdi-Line drain with Kerdi membrane” tells you exactly what you’re paying for. “Waterproof membrane system” tells you nothing.
How Do You Get an Accurate Curbless Shower Estimate?
Bids on curbless showers vary wildly because contractors scope the subfloor work differently, and that’s the single biggest source of change orders on these projects.
- Document existing conditions first. Take photos of your current shower pan, note your floor joist direction if visible from a basement or crawlspace, and know your current subfloor height relative to the bathroom floor outside the shower.
- Request a true line-item scope, not a lump sum. You want subfloor work, waterproofing system, drain, tile labor, and glass priced separately.
- Ask direct questions: Who handles subfloor recession, the general contractor or a sub? Which waterproofing system and drain model are specified? Who supplies and installs the glass? What’s the warranty on the waterproofing?
- Require a flood test in writing before tile goes down. A pan that’s built but not tested is a pan you’re trusting on faith.
- Flag vague line items like “shower prep, $2,500” and ask for a breakdown before signing anything.
Mrbuild’s bathroom remodeling process builds each of these steps into the written scope before a single tile is set, which is the same discipline worth demanding from any contractor you hire.
How Long Does a Curbless Shower Take, and Do You Need a Permit?
A typical curbless shower runs two to three weeks from demo to final glass install: one to two days for demolition, two to four days for framing and subfloor recession, one to two days for plumbing and drain rough-in, three to five days for waterproofing and curing, three to five days for tile, and one to two days for glass installation.
Permits are commonly required whenever plumbing lines move or structural framing changes, which is most curbless conversions. A structural engineer review sometimes gets triggered if joist modification is significant. Regional labor markets and inspection requirements can push mid-tier projects into premium pricing, particularly in coastal or high-cost metro areas where skilled tile setters and licensed plumbers charge more per hour.
What Does a Curbless Shower Cost Long-Term?
A well-built curbless shower shouldn’t cost more to maintain than a curbed one, but a poorly built one can turn into an expensive, recurring problem, and that’s the part homeowners underestimate when they focus only on the installation price.
Grout lines in a curbless shower see more water traffic than in a curbed design, since there’s no barrier stopping splash-out onto the bathroom floor. Resealing grout every 12 to 18 months, at roughly $150 to $400 for a professional job, keeps the waterproofing membrane from taking on moisture it wasn’t designed to handle long-term. Large-format tile with fewer grout lines cuts this maintenance need substantially, which is one reason premium builds lean toward slab tile despite the higher upfront material cost.
The bigger long-term risk is a waterproofing failure below the tile, and repairs there aren’t cheap. If a membrane fails, you’re looking at full tile demolition and pan rebuild, often $4,000 to $10,000 depending on tile material and shower size, because there’s no way to patch a failed membrane without removing what’s on top of it. This is exactly why a documented flood test at installation matters so much. It’s far cheaper to catch a leak before tile goes down than five years after.
Linear drains also need periodic cleaning of the channel and grate, a five-minute task most homeowners skip until slow drainage forces the issue. Point drains hide this same buildup inside a smaller opening, making it slightly less visible but no less necessary.
What Does ADA Compliance Add to a Curbless Shower Budget?
Building a curbless shower to true ADA-adjacent accessibility standards, rather than just a zero-threshold aesthetic, adds cost in a few specific places, and it’s worth knowing the difference before you budget.
A compliant shower typically needs a minimum clear floor space, often a 36 by 36 inch or larger footprint, which can mean expanding the shower beyond what a standard bathroom footprint allows. That’s a layout cost, not just a shower cost, and it can mean moving a wall or reworking a vanity, adding $2,000 to $6,000 to the broader bathroom scope depending on what’s in the way.
Grab bars rated for real structural load require blocking installed inside the wall before tile goes on, typically $200 to $500 in added carpentry if it’s planned from the start, versus $800 to $1,500 if it’s retrofitted after the wall is already closed. A fold-down or built-in bench adds $300 to $900. Anti-slip tile finishes with a higher coefficient of friction sometimes cost slightly more per square foot than polished options but rarely add more than a few hundred dollars total on a standard shower size.
The NKBA publishes design guidance that’s a useful reference point for verifying a contractor’s accessibility details are up to current best practice, particularly around clearances and grab bar placement, before you finalize a design that’s supposed to serve a household member with mobility needs for decades, not just years.
Mr Build Co.’s Perspective on Curbless Shower Costs
The surprises we run into most often aren’t glamorous. They’re a joist running the wrong direction for the slope we planned, or a drain line that has to reroute around a beam nobody flagged during the walkthrough. We price those contingencies into the written scope upfront rather than treating them as change orders later, because a homeowner shouldn’t discover mid-project that the “simple” recession just became a structural fix.
Our process starts with deciding foam panel versus drypack based on the actual shower shape and existing floor height, not a default preference, then coordinating the plumber and tile crew around one waterproofing sequence so nothing gets covered before it’s tested.
— David S.
Get a Written Curbless Shower Scope from Mrbuild
Mrbuild is the direct alternative to piecing together separate subcontractors for your curbless shower. A tile setter, a plumber, and a glass installer working independently means nobody owns the waterproofing sequence end to end. We do.

Every bathroom remodeling project we take on in Los Angeles starts with a written subfloor scope that states, in plain terms, whether recession or slab build-up is included and who’s responsible for it. We specify the waterproofing system by product name, document a flood test before tile installation, and handle permit filing directly with the city so you’re not tracking down inspection dates yourself. Our warranty covers the workmanship on that waterproofing system, not just the visible tile.
If you’re planning a larger bathroom remodel around the shower, our whole home remodeling team can scope the full project together. Reach out through Mrbuild to get a written estimate for your curbless shower before you compare bids elsewhere.
Sources
- How to Price a Curbless Walk-In Shower: Drypack vs Wedi System, Subfloor Recession Scope, and the Drain Placement Rule That Saves Bathrooms | TileForeman Blog
- What Is A Curbless Shower? | Angi

