


The correct approach is a continuous bonded waterproofing membrane meeting ANSI A118.10, tied to proper slope and drain placement, membrane that extends past the shower opening, and a documented 24-hour flood test before tile goes down. Every system you’ll read about below (drain type, membrane, tray or mortar bed, transition detail, and testing) exists to support that one requirement: no curb means no room for shortcuts.
TL;DR:
- Ensure the waterproofing membrane is bonded, continuous, and meets ANSI A118.10 standards, extending well past the shower opening for proper leak prevention.
- Verify that the standard slope of 1/4 inch per foot is maintained, with a flood test documented for 24 hours before tiling begins.
- Use pre-sloped trays, sheet membranes, or liquid-applied membranes suited to the shower’s geometry and installation skill level for reliable waterproofing.
- Confirm the transition zone at the doorway is extended several inches past the opening with proper overlap to prevent water migration under the finished floor.
- Insist on photographic documentation of each waterproofing stage, especially the membrane and transition details, to avoid costly failures or oversights.
Table of Contents
- Which Waterproofing Systems Actually Work for Curbless Showers
- What Order Do Contractors Waterproof a Curbless Shower In?
- How Do You Waterproof the Transition Zone Correctly?
- Concrete Slab vs. Framed Floor: Which Waterproofing Approach Fits Your Home?
- How Do You Verify a Curbless Shower Is Actually Watertight?
- What Mrbuild Adds to a Curbless Shower Scope
- What Most Homeowners Get Wrong About Curbless Shower Waterproofing
- Hire Mrbuild for a Curbless Shower Remodel Done Right
- Where to Verify Curbless Shower Waterproofing Standards
- Sources
Which Waterproofing Systems Actually Work for Curbless Showers
A curb-dependent shower pan liner relies on a raised lip to contain water. Take that lip away and the liner has nothing to hold against, so curbless designs need a bonded membrane meeting ANSI A118.10 installed directly beneath the tile across the entire wet zone, not just the shower floor.
You have three practical options, and each fits a different job:
- Liquid-applied membranes go on in multiple coats to a specified wet-film thickness, reinforced with fabric at corners and changes of plane. They’re flexible around odd geometry, but Sika’s technical guidance notes they’re operator-sensitive; a rushed second coat or a skipped reinforcement strip is where the system fails.
- Bonded sheet membranes come at a consistent factory thickness, which removes the guesswork liquid systems carry. Seams need proper overlap and sealing, but the material itself doesn’t vary from spot to spot.
- Pre-sloped trays build the pitch into the base itself, which is useful when jobsite depth or installer skill is tight.
If you’re set on large-format tile or you have a shallow remodel budget where mistakes are expensive to fix, lean toward sheet membranes or a factory tray. If your shower floor has unusual angles or a bench built in, a liquid system applied by an experienced hand still gets the job done.
What Order Do Contractors Waterproof a Curbless Shower In?
Every reliable curbless install follows roughly the same sequence, and knowing it lets you check a contractor’s work as it happens rather than after the tile is grouted.
- Prep the substrate and build the slope. This means recessing the slab or raising the surrounding subfloor so water has somewhere to go. Standard slope is 1/4 inch per foot toward the drain, though some jurisdictions allow shallower pitches for ADA roll-in access. Verify which rule applies before pouring anything.
- Set the drain. It has to integrate with the membrane through a bonding flange or a compatible collar, never just sit in a hole cut after the fact.
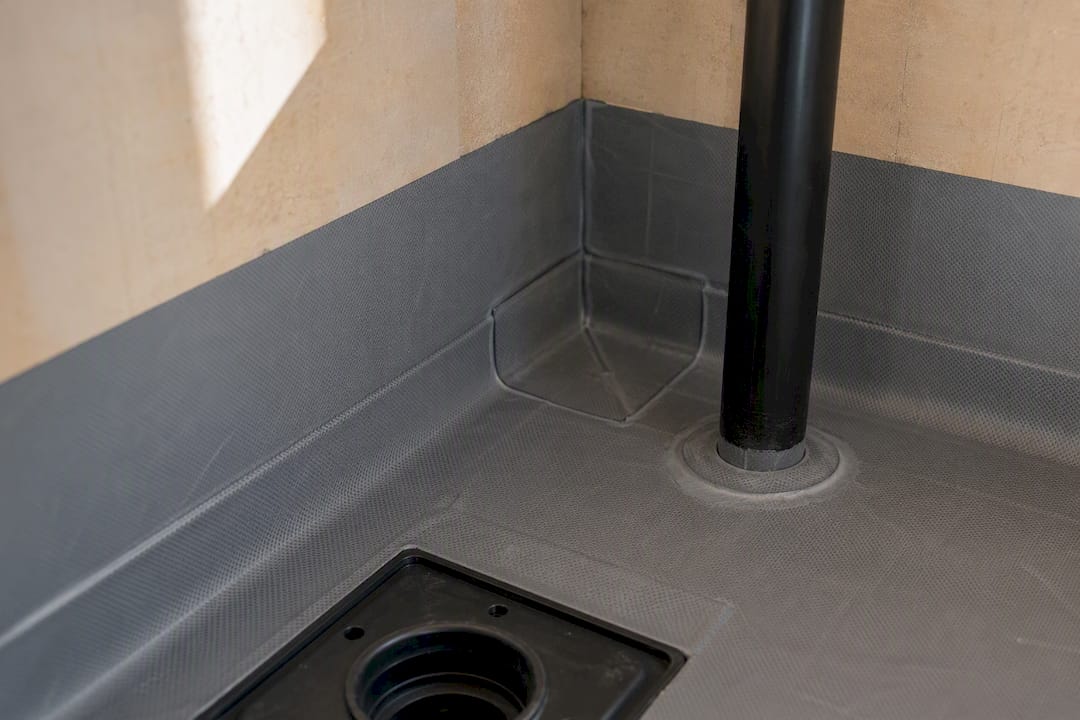
- Apply the membrane across the entire wet zone. That includes the floor, up the walls to the required height, and through the transition at the entry. Use pre-formed corners and pipe collars at every penetration, and overlap seams to the manufacturer’s spec.
- Set the tile using a method appropriate to the membrane, and grout with epoxy in the wet zone. Cementitious grout absorbs moisture over time; epoxy doesn’t.
- Flood test before you tile anything else in the room. Plug the drain, fill the pan, and hold water for the documented period. Only move forward once it passes.
Most failures trace back to skipping or rushing one of these five steps, according to PlaceForPros’ waterproofing guide, and improper slope, membranes that stop short, and undersized drains cause the bulk of them.
Pro Tip: Ask your contractor to photograph each stage before it gets covered, especially the membrane at corners and penetrations. Those photos are worth more than any verbal assurance once the tile is down and you can’t see what’s underneath.
How Do You Waterproof the Transition Zone Correctly?
The transition, where the shower floor meets the bathroom floor, fails more often than any other part of a curbless assembly. Extend the bonded membrane well beyond the opening rather than stopping it at the threshold, since experienced installers treat that overrun as standard practice to handle splash and vapor migration.
A linear drain placed at the entry or along a wall lets you slope the entire floor in one plane instead of tilting toward a center point from four directions. That single-plane pitch is why linear drains have become the preferred choice for curbless designs, and it also makes large-format tile easier to lay without awkward cuts.
Get the slope right and use pre-formed ramp pieces at the entry rather than improvised mortar builds:
- Standard pitch is 1/4 inch per foot; confirm any ADA exception with your local inspector before assuming it applies.
- Build a slight back-slope into the shower at the threshold so water drains inward instead of creeping toward the bedroom or hallway.
- Use manufactured transition or ramp pieces rather than field-mixed mortar, which shrinks and cracks unevenly over time.
The most common mistake is a membrane that simply ends at the door opening instead of running several inches past it, leaving a gap where water can migrate under the finished floor. A close second is insufficient overlap where the floor membrane meets the wall membrane, a detail that’s invisible once tile covers it and expensive to fix afterward.
Concrete Slab vs. Framed Floor: Which Waterproofing Approach Fits Your Home?
Your existing floor structure decides how much of this project is waterproofing detail versus structural work, and it changes your budget more than any tile choice will.
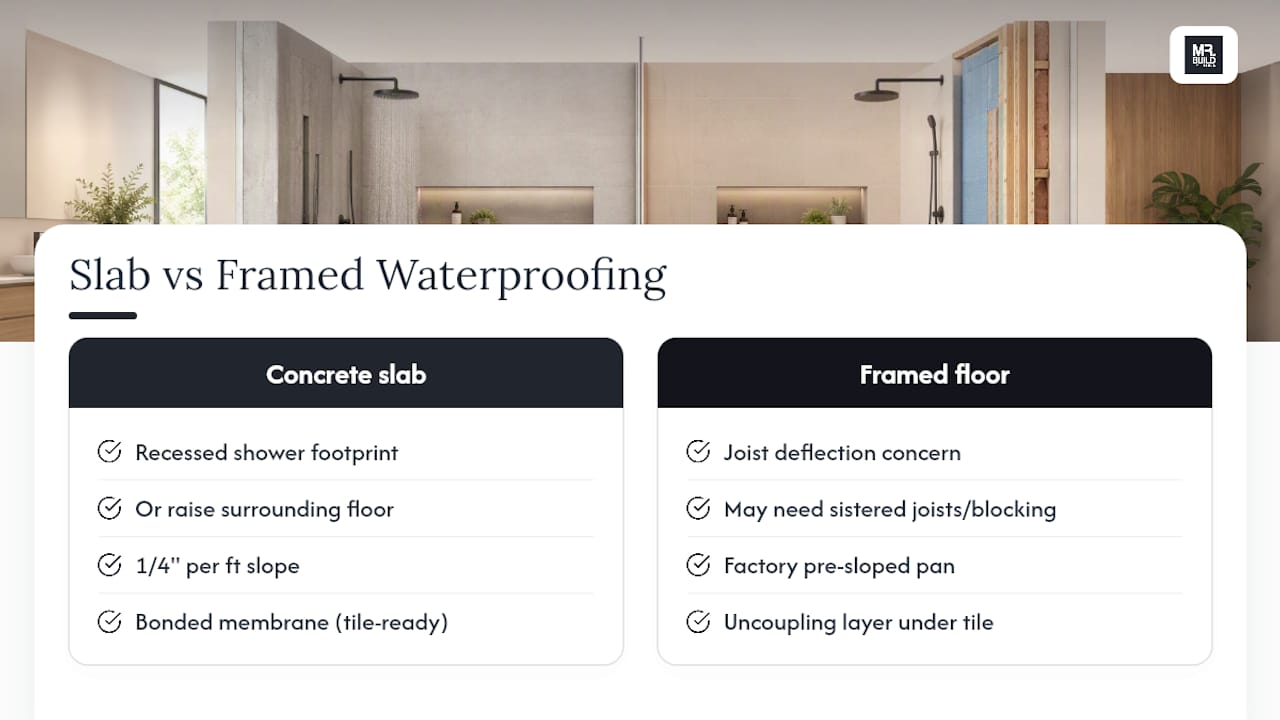
On a concrete slab, you generally recess the shower footprint into the slab itself, or raise the surrounding bathroom floor to meet a shallower recess. TCNA’s curbless methods call for a recessed slab with 1/4 inch per foot slope and a bonded membrane rated for direct tile application. Depth matters here: if the slab can’t be cut deep enough for a full mortar bed, a linear drain with a shallower recess requirement or a thin pre-sloped tray becomes the more realistic option. Watch for excessive mortar bed thickness in either direction, since a bed poured too thick is prone to cracking and bond failure, according to TileLetter’s planning guidance.
On a framed floor, deflection is the concern a slab never has. Wood joists flex under load in ways concrete doesn’t, and that movement can crack a rigid membrane or tile bed if it’s not decoupled. This usually means a factory pre-sloped pan rated for framed installation, or an uncoupling membrane layer between the subfloor and the tile assembly. Some framed floors need sistered joists or added blocking before waterproofing even starts.
Choose a pre-sloped tray when depth is limited or you want a guaranteed pitch without relying on a mortar bed. Choose a mortar bed and bonded sheet membrane when you want flexibility in drain placement or unusual floor dimensions that a factory tray can’t accommodate.
How Do You Verify a Curbless Shower Is Actually Watertight?
Don’t take a contractor’s word that a shower is watertight; ask for proof before a single tile is set.
- Flood test the pan. Plug the drain, fill the shower floor with water, and hold it for 24 hours. This is the accepted verification method contractors and many inspectors expect before tile installation proceeds.
- Document the result in writing and photos. A timestamped photo of the filled pan, plus a written pass/fail note, protects you at resale and supports any warranty claim down the road.
- Confirm which permit triggers apply. Drain relocation and structural slab work commonly require inspection sign-off in most jurisdictions. Build the flood test into your contract as a required milestone, not an optional nicety, so payment for the next phase depends on passing it.
What Mrbuild Adds to a Curbless Shower Scope
Mrbuild treats a documented flood test as a contract requirement on every remodel we scope, not an afterthought. That means specifying ANSI A118.10 bonded membrane by name, the exact slope target, the drain model and collar, and the flood test itself as a line item you can point to. A scope line that reads “install bonded waterproofing membrane per ANSI A118.10, minimum 1/4 inch per foot slope to drain, 24-hour flood test documented with photos prior to tile” gives you something concrete to hold a bid against. That’s the standard we bring to every bathroom remodeling project in Los Angeles.
What Most Homeowners Get Wrong About Curbless Shower Waterproofing
The mistake I see most often isn’t a bad membrane choice. It’s homeowners assuming that because a product carries an ANSI A118.10 rating, the installation is automatically sound. It isn’t. The standard governs the material, not the installer’s overlap technique at a corner or how far past the threshold they extended the membrane. Two contractors using the identical Sika or Schluter system can produce wildly different results depending on whether they treated the transition zone as an afterthought or as the critical detail it is.
Conventional advice tends to fixate on drain type, linear versus center, as if that choice alone determines success. It matters, but far less than whether the membrane is continuous and whether someone actually held water in that pan for 24 hours before tiling. If I could get homeowners to prioritize one thing, it would be this: don’t accept a verbal assurance that a shower “was tested.” Demand the photo, the timestamp, and the written result before you sign off on the next phase. That single habit catches more problems than any material upgrade.
— David S.
Hire Mrbuild for a Curbless Shower Remodel Done Right
A DIY curbless shower saves money upfront and costs more when the membrane fails behind tile you can’t see. Mrbuild handles bathroom remodeling, ADU builds, and turnkey whole-home projects across Los Angeles, and every curbless shower we scope includes ANSI A118.10 bonded membrane, correct slope and drain integration, and a documented flood test with photos before tile goes down.

If your remodel involves floor recessing or a structural change to accommodate a curbless entry, our ADU and home addition team scopes that work alongside the waterproofing plan so nothing gets treated in isolation. And if a new shower door is part of the plan, One Day Doors & Closets’ guidance on bathroom door choices is worth a look before you finalize the entry layout.
Ready to see how this works for your bathroom? Visit our bathroom remodeling page to view past projects and request a consultation.
Where to Verify Curbless Shower Waterproofing Standards
For the code language behind everything above, check TCNA’s curbless shower methods for slope and slab detail, the ANSI A118.10 standard for membrane requirements, and manufacturer pages like Sika’s wet room systems and Schluter’s curbless shower resources for installation specifics.
Sources
- Curbless & zero-entry shower waterproofing guide | PlaceForPros
- What are the waterproofing requirements for a curbless walk-in shower on a concrete slab | RemodelMePros
- Wet room solutions and waterproofing systems | Sika

